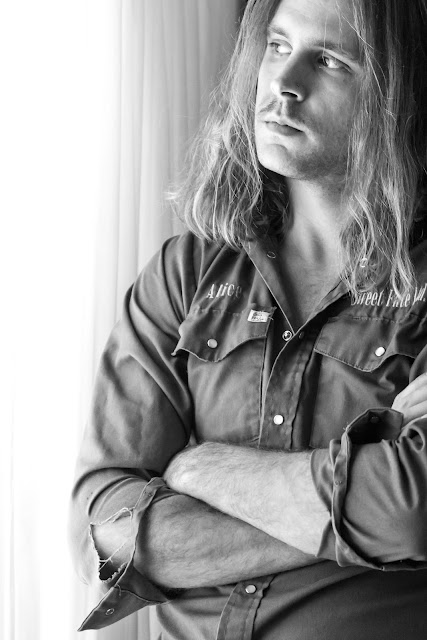
As you can see, I've managed to find my first model! A desperate plea to the masses on the Facebook was all it took. He was willing to bear with my camera fumbling and have a shoot done, and I've responded with some more pictures that I'm proud to call my freshman effort at portrait photography. The photo you see above was one of my favourites - it came out celery crisp (despite the fudgery of the image hosting here... anybody have any solutions for this?), and it was just a really natural, neutral expression. So it's one of the photos I spent the most time editing, yes, but it's also the least "modified" because I really wanted to keep the simplistic theme intact.
That brings me to my next point: this is the kind of thought process you want to be going through, whether you're shooting or editing photos. What look are you trying to achieve, and what will help you get there. It doesn't hurt to look at existing examples for inspiration. Whether you're looking at your own photos or somebody else's, if you want to improve, you should constantly be dissecting images, looking at what works, what doesn't, and why. Coupling this with a sturdy understanding of photography and post-processing basics will help you conceptualize both, if you're hoping to really make a difference in your end product. You don't have to agonize and over-analyze, but this is something you should be able to do subconsciously... but don't be afraid to break the rules and experiment. One of the most important factors I chalk up to my learning process in everything is being okay with doing things wrong, and pushing the boundaries... how far does something bend until it breaks?
So back to the shoot - I didn't really know what I was going to have available for lighting, I didn't even know where I was going to do the shoot. At the last minute, it ended up being at the aunt's home of my model here. It was also overcast. The home itself was pretty cramped for the purposes of a photoshoot, and was definitely limiting as to what I could get away with; not to mention that it was about -15 degrees outside, making it pretty uncomfortable outdoor shooting weather. The good thing is that these limitations force you to think more about how you're going to utilize what you actually do have. The lighting, for instance, was soft (being overcast), but it was pouring in through the windows, to give me a touch of natural and directional "masculine" lighting. Being that I didn't have much space, I ended up getting a lot of close-up portrait type shots... but again, with the space it was hard not to get photos that were too busy, with backgrounds detracting from the subject. One solution I found was shooting directly into the window. The bright outdoor light made for some cool backlighting, and washed out the rest of the space in the picture to create some nice clean negative space. Again, these are the sort of things you should be thinking about and playing with when you're taking pictures.
The photos I took were still far from perfect. Some overexposed, some underexposed. Some shots I really liked turned out blurry or fuzzy looking, like the one you see below. That doesn't mean they were ruined, and I actually like how this picture turned out after a few adjustments. It was purely through experimentation that it ended up this way, like cranking up the tint 'till I got that pinkish hue, at which point I probably did a little "Oooh, I like". Or turning up the grain to give it an indirect voyeuristic feel to it. See, I can make up whatever wordy justification I like for my shitty photos. That's art, baby! So I tried a variety of different modifications to my photos, primarily because I like to see just that: variety, and I thought the fella I was shooting the images for might too; but I also just wanted to see what happens when I try different things out, in line with my earlier rambling about pushing boundaries.
On the more technical side of things, I should also note what tools and tricks I used for the shoot. I used a 100mm macro lens for majority of the close up shots. I also carried an 18-135mm zoom lens with me which I used for a few different shots at roughly 70mm, like the one below. I also had a few new toys, in my bag of goodies. A tripod, which is immensely useful for getting better exposure and crisper images. Make sure you get a good sturdy one though. The one I'm borrowing is a little on the cheaper side, and I do find myself fighting with it. Another new addition was a reflector, hand-made by yours truly with a piece of cardboard and aluminum foil. It worked great for adding a boost to the lighting where needed - particularly the backlit ones, and I was lucky enough to have a lighting assistant in my model's lady-friend (also seen pictured below). An external flash was also used, albeit sparingly. There were some shadows and exposure problems to contend with, but this big bright photo wouldn't have been possible without it. One thing I can say about using flash, changing the direction of the light or diffusing it with something as simple as a piece of paper makes a big difference in helping along your photos, so with that in mind, don't be afraid of the flash!
That's all for now folks, catch you in a week or so.


No comments:
Post a Comment